Tag: olivia munn


many of you have written: what’d you use on her lip? i need that red!

November 27th, 2013 — 4:10am

redlips+cheekblog

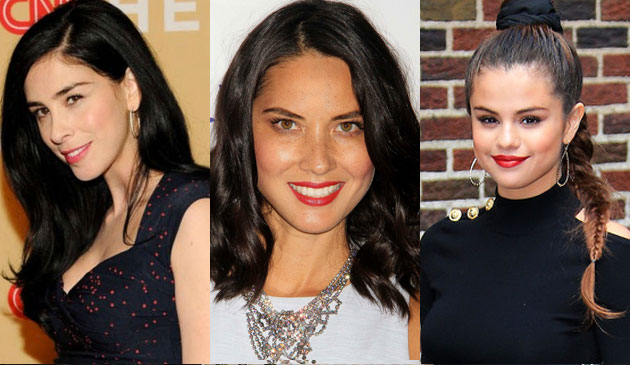
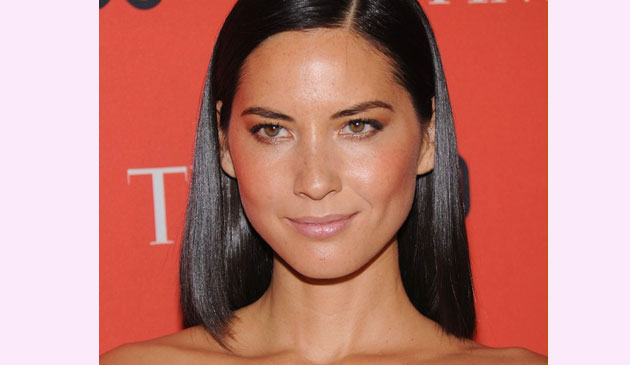
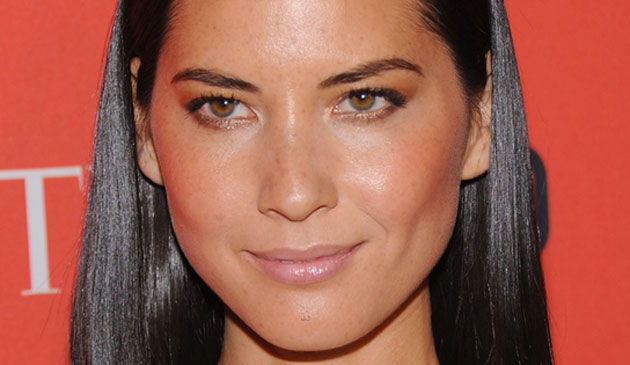
Honestly, it hasn’t been me always pushing for the red lip and soft cheek color you’ve seen me do for so many of my clients… although I do love the look. I mean, look how gorgeous Sarah Silverman was when sporting the matte, intensely bright, yet sheer pop of color I chose for her. Olivia Munn’s smile was overwhelmingly beautiful when I painted it a bold blue red with a hint of creamy shine. Then there’s Selena Gomez who I gave a number of intensely pigmented creamy layers of matte orange-red crayon, and then topped them with a strategically placed highlight color in the middle of her bottom lip and just under her cupids bow that kept her radiant as she smiled, talked, and sang her heart out.  Nope, it’s by far the most frequently requested look for red carpet events by the beautiful women who will be wearing them.

I can’t tell you how many inquiries I get from you wonderful folks who follow my blog/facebook/twitter/instagram, as well as from beauty editors at all of our favorite magazines and blogs, asking me to share which products I use for the perfect red lip of all finishes and intensities. With that said, I feel that the time has come for me to give you a quick run down of some of my current favorite red lip products. Red lips can be the thing that takes your look from au natural to va va voom, and your confidence level from blah to bold.

These are things I’ve learned that i’d like to pass along to you that will help you make the most of your painted lips:

  1. Always make sure you’ve exfoliated your lips, especially the inside part of your bottom one. The best time to do it during or after a warm shower, and the best way to do it is to use a soft toothbrush, a soft washcloth, a makeup wipe, or even the pad of your finger (really only works when you’ve been in the shower for a bit). Gentle little circles, and never harder than you’d scrub an overripe tomato.
  2. Use a lip liner if you want a more precise edge, if your lipstick tends to bleed into the lines around your lips, or if you’re a lip licker and your color tends to fade quickly. The harder wax formula of a liner will help your lipstick stick around longer. I haven’t found any lip liners in the green beauty world that are intensely red (if you know of some, please let me know!), and my go-to’s are always usually Cherry and Brick, from MAC.
  3. Once you’ve finished applying your color, place a q-tip between your lips, with the tip of the swab side touching your front teeth, parallel to the floor. Form a kiss shape with your lips around the qtip and gently drag it out of your mouth, allowing it to pass along the inner parts of your lips, to remove any excess color that would otherwise have set up camp on your teeth. (aack!)
  4.  Bring the lipstick with you, along with a tinted lip balm, or even just a regular old clear lip balm. In case you don’t have a chance (or the interest) to check your lipstick every so often, re-moisturizing with a corresponding shade of tinted lip balm can help keep the color even and crack-free.

Ok, so which products can you turn to if you want to recreate the above looks that I did?

On Sarah:

A light application, applied with your finger, of OCC lip tar, in NSFW, and into your purse slide a  Rose tinted lip balm from Burt’s Bees for touch ups.

On Olivia:

A number of good thick swipes of Ilia’s Wild Child lipstick and top it with Ilia’s Crimson and Clover tinted lip conditioner.

On Selena:

There’s a lot going on in a lip color like this. I love to mix and blend and create depth by using different shades and textures, but you could certainly create a similar look with fewer products   From BITE beauty, a thick swipe or two of the crayon called Poppy as your base, a light tapping of Bite Beauty’s Pomegranate crayon along your lips, and finish by pressing either a lip brush, or your finger, coated with Red Apple Lipstick in Sunkissed (a bright orange) into the center of your bottom lip, and along the under side of your cupids bow for a little highlighty gleam action. If you didn’t want to go the green products route, you’ll find a similar color lipstick from MAC called Ruby Woo.

There is no wrong time to wear a lip color that makes you feel good, and no matter what size your lips are, how ‘bad’ you are at makeup, or because you’ve never done it before, you should try out a red lip at least once in your life. Find one that YOU like and then parade around in front of family, friends, and strangers, and see what kind of reaction you get. So listen, if you decide to rock an intense red lip to the thanksgiving dinner table tomorrow night, just remember:  you can check the status of your application by angling your knife just-so, as you’re cutting the veggies on your plate, and no one will be the wiser.

Kisses!


Comments Off on many of you have written: what’d you use on her lip? i need that red! | ...We're all connected

get Olivia Munn’s glowing skin and smokey bronzed eye

July 13th, 2013 — 9:04pm

Olivia_munn_blog_opt1

This image was taken the first time I worked with Olivia a few months ago. I’d always admired how great her makeup looks on the red carpet, and always thought she was one of the most beautiful actresses around. Olivia definitely knows how she looks her best – from the shape of the eyeshadow, to the angle of the eyeliner, and the placement of contour and cheek color. She shared with me that she’s worked with a fantastic makeup artist in Los Angeles for many years, and from the pictures she’s shown me from the events where she’s done her own makeup, it’s obvious that she, herself, seriously knows how to paint her own face – and put on false eyelashes better than anyone else I’ve ever known!

Before I tell you how to recreate this makeup look for yourself, I want to share with you this story:

Recently I arrived at Olivia’s hotel room to do her makeup for a TV show appearance. Before taking a seat in front of me, she reached into her purse and pulled out small bag containing a bottle of nail polish and a bottle of polish remover she’d just picked up at Whole Foods.  I was so excited (as only a green makeup artist can be) by what I saw.  Of all the options she had between the equally as close in proximity drug store, mainstream grocery store, and beauty supply shop, she made it a point to spend her dollars on nail products that are made by companies that have made a concerted effort to be as toxin-free as possible. The color was a killer shade of red, and the remover worked extremely well to remove the polish she started out wearing.  It’s the little purchases like this that say a lot. Companies that attempt to do better for the environment and for their consumers need our support.

Just one more reason why I’m so stoked to work with Olivia. Plus she personally makes the rounds to say thank you, and shakes the hand of every single person that had even the smallest roll on whatever photo or video shoot she’s working on. Who does that?! Olivia does, and it makes everyone feel *so* good.

Okay, back to telling you how you can make your own face glowy and bronzed:

FACE:

  • I favored a really dewy complexion for this glowy look. I started with a tiny bit of La Bella Figura’s Rainforest Hydration Treatment and thoroughly massaged it into her face and neck. A little goes a long way to intensely hydrating skin. I waited about 20 minutes until it had fully absorbed to begin perfecting her skin, which works out well since I always start with eye makeup first.
  • Once I finished her eyes, I used Vapour Organic Beauty’s Atmosphere Luminous Foundation Stick, applied with a small foundation brush, and worked it into the areas in need, patting it into place with a damp – but not at all wet to the touch – beauty blender sponge.
  • I started building the bronzed glow by first laying down a layer of cream highlighter from RMS beauty (living luminizer) on the areas of her face that I wanted to reflect the most light in front of the paparazzi: the bridge of her nose, her cheekbones and her cupids bow.
  • It wasn’t until I was nearly finished with the rest of her makeup, that I went back and mixed two colorful shades of Vapour cream cheek stick color in Torch and Courtesean  on my small, fluffy brush, and swirled them around the apples of her cheeks, just to give a brightness to her face.
  • Then I went to work with my favorite Dr. Hauschka powder bronzer, placing it onto her skin with a large, fluffy, super soft powder brush. The trick when powdering on top of cream is to make sure the cream has set as much as it can, and then place the powder color on top with a large brush. If you buff it too much you run the risk of smearing the cream below and creating streaks.
  • To finish her cheeks, I went back with a matte brown bronzer called Mauna Lao, from Alima Pure to add more definition to her cheekbones, and I softly placed the powder underneath them with a small eyeshadow blender brush, to really make them pop.

ON HER EYES:

  • I love Kjaer Weis’ eyeshadows and use them all the time. Here I placed ‘Charmed’ under her eye, and then over her entire lid, blending it upwards for a sheer application from crease to brow. Then I used my same Dr. Hauschka’s matte bronzer with a fluffy eyeshadow blending brush to create a little depth in her crease, particularly towards the outer edge.
  • It’s no secret that I love some serious lashes, so I curled the heck out of hers, and then applied 400 coats of covergirl lash blast, in very black (and a few individual fake lashes from Ardell for a little extra depth)
  • I filled in her brows with a deep brown brow pencil

ON HER LIPS

Et voila.

Thanks to Glamour magazine for calling Oliva’s look out in July’s issue as a beautiful way to bronze!

Just look at that face! Gorgeous!

olivia_munn_close_up_blog

Comments Off on get Olivia Munn’s glowing skin and smokey bronzed eye | ...Here's how to

Back to top