Tag: lipgloss


Look Perfectly polished in nothin’ but the basics.

April 15th, 2014 — 6:02pm

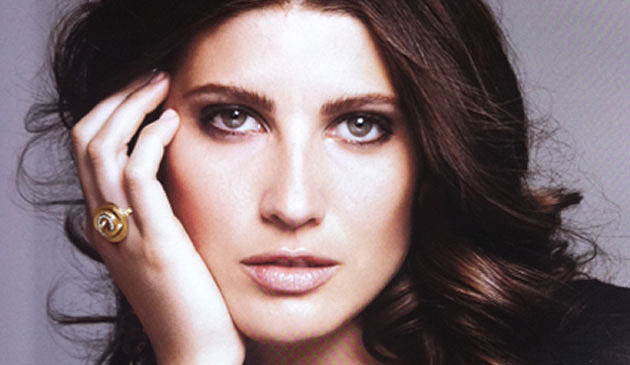
MicheleAlvez_makeup_basics


Every season, fashion and beauty magazine editors and bloggers ask me “ What are the top 5-10 things every woman must have in her makeup bag?”

My answers vary slightly, depending on the age of their readership, but overall I’m known to favor keeping makeup rather simple and timeless.  To me it’s always been about enhancing ones’ features, which can be done with just a few simple products.

Please don’t mistake my short list of musts for a lack of support for those of you who want to experiment with wild eyeliner hues and bold, trendy lip color. I’m a big fan of that sort of thing, as well. But first I think it’s important to iron out the basics, and find what works best to enhance your favorite features, keeping your every day look as fresh-faced and minimally made up, as possible.  Once that’s established, playing with extras is a breeze.

In writing this post, I’m assuming you’ve gotten your skin care regimen down, and are starting with hydrated, nourished faces. This is not such an easy feat for so many of us, and if you’re having difficulty in this venue, the good news is, there are countless treatment options in the green beauty world for every skin type. It just takes some research and often a bit of trial and error.

So… what do I think no woman should live without (I really don’t feel that you couldn’t live without makeup – or things in general – but I think you know what I mean).

  1. A good eyelash curler. My favorite has been the one by Shu Umera because of the texture and shape of the pad, and overall shape and sturdiness of their handle and the part into which the pad fits.
  2. A creamy, neutral eyeliner. Depending on your hair and eye color, as well as your skin tone, and personal preference, this could be a pale taupe, a deep brown, a medium gray, or a deep, dark black.  Keep some cotton swabs on hand to smudge the line you draw, buffing it out ever so slightly.
  3. A mascara that gives the look you favor, whether that’s longer, thicker, darker, or all of the above. (I prefer all of the above)
  4. Tweezer. I can’t emphasize the benefit of a good tweezer enough. Shaping your brows and whisking away unwanted hairs from other regions of the face where they begin to show up – it’s  a necessity.  I’ve been a fan of  the Rubis for years, but it’s really all about finding one that feels right in your hand.
  5. Two cheek colors: one that makes you look warm and glowy, and one that mimics the color your cheeks turn when your heart rate has been pushed. I generally favor creamy cheek colors, but this is a personal preference thing.
  6. Two concealer shades: one with a bit more peachy/orange undertone to cut the purple inherent in under eye circles.  Then, one concealer that matches your skin tone and texture perfectly to cover spots as needed. I always like to finish a concealer/tinted moisturizer/ foundation application by pressing a slightly dampened beauty blender sponge into the skin to ensure that the texture of the product matches the texture of your skin. Don’t skip this step if can help it.
  7. 3 lip colors. Most women I know have many more than this, but honestly, if you have limited funds, a desire to keep your purse as light as possible, or become overwhelmed at the thought of keeping up with lip trends, three shades is perfect. I’d start with a sheer, tinted lip balm in a color that’s pretty similar to your lips, add a similar shade in a proper lipstick formulation that’s somewhere in the satin range – moist, not matte, yet not glossy, and finally, a color that you love, and that gets smiles from others when you wear it – could be a bright pink, an orangey red, or a deep berry.
  8. A sheer gloss. I lied – having a fourth lip product that feels good and has a bit of a moist look is always a good idea. This can be layered over any of the above, or worn alone when you’re feeling glossy.
  9. An eyebrow brush/pencil/powder/gel: When we’re young, our brows are usually at their fullest. You may want to brush them into a lovely shape in the morning and forget about them. As we age, however – even as early as in our early 30’s, our brows may start to look a bit less full, particularly towards the tails. Finding a brow pencil or powder that looks super natural is the way to go. Light strokes, mimicking the hair growth pattern is all you need, along with good lighting, to create a frame for your face. I’ve just recently found Eco Brows, a richly pigmented brow gel product in a pot, and really like it. I also love the fine point and ease of use of the brow pencils from MAC.

There you have it.

Here are some of my current favorite all natural products you can use to create this very pretty, basic look I did on my friend, the gorgeous model, Michele Alvez:

Comments Off on Look Perfectly polished in nothin’ but the basics. | ...Here's how to

show off your love for spring with a pretty pink pop

March 8th, 2013 — 5:38pm

angelahighsmithforblog

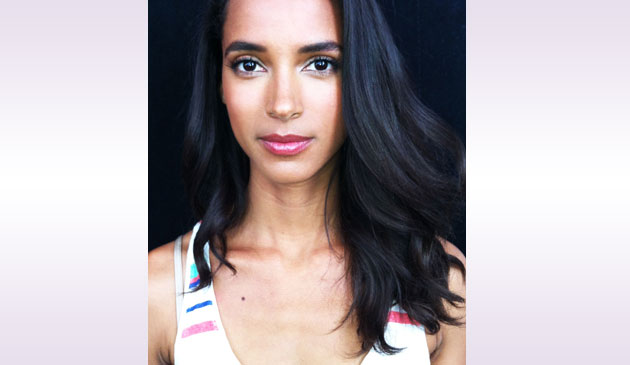
It’s always a real learning experience for me when model Angela Highsmith sits in my makeup chair.  Early on we discovered our shared passion for all things natural, and my respect for her body of knowledge grows every time we spend a day on set together.

At some point she told me that she brews up a tea for her daughter (this youthful beauty is a mom to a 10 year old) from an herb called Skullcap to ‘help chill her out before school’, and then went on to tell me about her herb garden and all the concoctions she makes to treat cuts and bruises from what she has growing in her own back yard. I recently introduced skullcap tea into my repertoire of ways to chill myself out and get ready for bed… and it actually does the trick!

Her knowledge of making her own medicines doesn’t stop there: she treats a variety of sensitive skin issues with oils, salves, and cold creams made with her own two hands, and a wealth of information she received during the many classes she’s taken at the New York Open Center, and in one-on-one sessions with herbologists.

When I asked her how she became interested in herbs, and the world of natural beauty products, she told me that she’d been interested in natural healing ever since she was a little girl, and that she used to make believe she was a Native American living off the land, with only what she found in her yard to eat, and to survive. As she’s gotten older, she explained, the natural products she uses become more and more natural: from using store-bought products with naturally derived ingredients, to focusing on searching out organic and edible products for skin and hair, to now making a good number of what she and her family uses, all by herself.  Very crafty and smart of you, Angela! Can I come over one day and see your garden?

On the day of this photo shoot I created a naturally glowing look with the following products – and even the most discerning green beauty aficionado would approve:

1.     Amala cocoa bean face oil massaged into Angela’s sensitive skin

2.     Vapour Organic Beauty liquid foundation used sparingly, starting from the center of the face, and blending outward

3.     Mineral Fusion concealer under her eyes very sparingly

4.     RMS cream eyeshadow in ‘Seduce’ on just her lids, applied with my fingers

5.     Onto curled lashes I applied a few coats of Honey Bee Gardens mascara in black

6.     Dr Hauschka bronzing powder swirled along her temples and across her cheekbones

7.     Burt’s Bees lip shimmer in Watermelon topped with a light coat of Burt’s Bees lipgloss in Spring Splendor

We both loved this fresh, gorgeous look (with just a pop of lip color) so much, that I thought to take a photo of her at the end of the day after she’d changed back into her street clothes. Can you believe this shot was captured at the end of an 8-hour day on set? Just beautiful, Angela, just beautiful!


Comments Off on show off your love for spring with a pretty pink pop | ...Here's how to

More reasons to love the Fall… Rich berry colored lips!

October 13th, 2012 — 12:23am

Fall: It’s that sweet spot between end of the summer and the start of the holiday season. It’s time for you to break out those gorgeous fall lip colors and see how fun they are to wear. Choose from a barely there sheer wash of color, super pigmented mattes, and glossy payoffs.

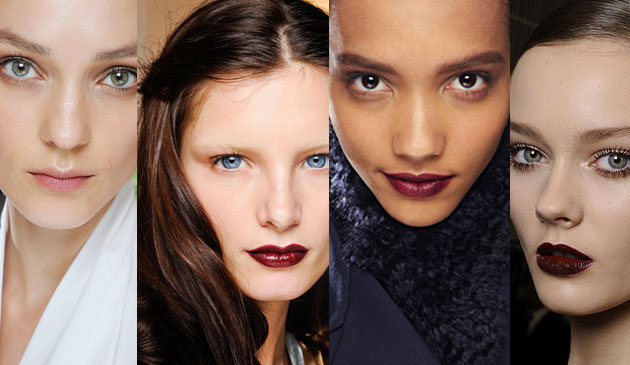
A good number of you have asked me for a lip color round-up to introduce you to some of the shades we see this time of year on the runways and red carpets:  deep, rich plums lipsticks, purple-y red glosses, satin-finished blackberries, and sheer merlot stains. It’s not always easy, though, to gauge just how this type of color is going to look on the lips.

The finished product not only depends on the way in which you apply:

1. directly from the tube, with a heavy hand, in a smeared, back-and-forth motion;

2. from the tube, but only lightly dabbing the stick onto your lips;

3. with a lip brush to make a precise edge;

4. by tapping your finger from the tube to your lip, adding layers of pigment until you reach the desired intensity level,

but it also depends heavily on what your natural lip color is before you start applying.  Those with a lot of pink or red in your lips are going to find that the deep purple wine stains can take on a completely different hue, and those of you with a really deep brown color to your lips may find that some of these shades disappear completely on you, or never show up with enough intensity, no matter what you do.

All of that said, it’s really difficult for someone like me (or a makeup company, for that matter) to definitively advise you on what to buy based on how you look sans lip color.  I can however, suggest shades to play with, and tell you my favorite ways to apply them. What should ultimately influence your decision when you’re standing at a makeup counter, or staring at lipstick swatches on the screen of your computer, wondering: when was the last time my  laptop’s color temperature was calibrated? [NEVER?!] are variables like: your eye color, your hair color,  your skin tone, your clothing color palette, your mood…

In no particular order (really, just the order in which I pulled them out of my big ol’ bag of lipsticks), here are some of my favorites. Those of you who follow this blog based on our shared love for ‘green’ beauty options, please take note that there are a handful of lip colors that don’t fall into that category, however, they’re such rich and dense shades – shades which are not readily available (or at least not that I know of!) in the all-natural world of lip color – that I often use them on photo shoots when I need that intensity. I did just check Jane Iredale’s webiste and found that she has a few deep purple shades that I have not yet tried.

HOW TO GET: NOT TOO HEAVY, NOT TOO LIGHT: THE PERFECT APPLICATION OF COLOR

When you’re new to wearing these shades, it can be overwhelming to see yourself with a thick application of. let’s say, Ilia’s ‘Ink Pot‘, or Mac’s ‘Rebel’ (which are very similar in color).  Instead, try tapping the lipstick onto your lightly lip-balmed lips, or use your ring finger to tap a good amount of product from the tube, and then press the pigment into your lips. This is how I generally apply all lipstick, even on myself. It helps to ensure less caking along the corners of your mouth as the hours pass, and through the act of pressing the product into your lips, you’ll find it sticks around longer than if you simply swipe the tube across your pout once or twice.

HOW TO GET: SHEER COLOR WITH A DEWEY FINISH

There are a multitude of great sheer options on the market that are easy to apply, and the more swipes across your lip, the deeper the shade becomes. My top favorites include: Burt’s Bees Lip Shimmer in’Prune’ and Kjaer Weiss’ ‘Sensuous Plum’.

HOW TO GET: SHEER GLOSSY LIPS

Trying out a lipstain, like ‘Quickstep or ‘Foxtrot’ [Foxtrot not pictured below]’ from Josie Maran is another great way to become acquainted with these shades. To start, color the marker onto UNMOISTURIZED lips (this is important to ensure the color will adhere), and then try following up with a gloss, like the gorgeous blackberry one from Vapour Organic Beauty in ‘Bitten‘, or their more chocolate shade ‘Risque‘. This makes for a luscious and easy to wear fall shade.

HOW TO GET: INTENSELY COLORED, MATTE OR SATIN FINISH LIPS

If you’re going for a much more dramatic look, make sure that your lips have been moisturized, but then blot them with a tissue, to ensure that your deep lipstick of choice adheres evenly, and depending on the look you’re going for, you might want to lightly outline your lips in a similar shade lipliner to ensure the color doesn’t bleed.  I wouldn’t advise that a dramatically deep, highly pigmented purple or merlot shade (like the one pictured on the model in the photo on the right) EVER be  highly glossy (i.e. adding gloss on top of the lipstick) in real life (a photo shoot is a different story). It’s guaranteed to slide off your lips, appear blotchy, and get on your teeth. This means that a super deep shade should be in a matte, satin, or have a super light dewey finish. It’s a great idea to lightly touch a tissue onto a closed mouth to ever so slightly remove excess product. My picks to accomplish this kind of look: NARS, ‘Train Bleu’ matte lip pencil, Chanel ‘Rouge Noir’ Lipstick, MAC Smoked ‘Purple Matte’ Lipstick, and Vapour Organic Beauty ‘Siren Bold’ Lipstick.

HOW TO AVOID:  THE DREADED LIPSTICK ON YOUR TEETH LOOK!

My grandmother showed me the best way to ensure that this embarrassing faux pas doesn’t happen:

1. after applying your lip color, open your lips into an ‘O’ shape.

2. grasp a cotton swab by the middle between your pointer finger and thumb, placing one end of the swab into your mouth, keeping your fingers on the handle, just outside of your mouth with the other cotton bud end pointing straight out, parallel to    the floor.

3. Pucker your lips like you’re  blowing a kiss around the handle of the swab, and gently pull the swab out of your mouth, making sure the inside of your lips comes in contact with the cotton as it leaves your mouth.

4. Repeat with the other side of the swab.

Voila – all of the excess color that would’ve ended up on your teeth has been swept away! Packing a few q-tips in your purse is always a good idea, to use for this trick, or to clean up fallen mascara.

The final two shades on the bottom right of the photo below are soon to be released, are part of the ‘green’ family of beauty products, are super affordable, and super beautiful. Once they hit the market I promise to tell you who makes them!

Happy leaves-changing, sweater-wearing, chilly hands, feet, and noses, FALL WEATHER everyone!


Comments Off on More reasons to love the Fall… Rich berry colored lips! | ...Here's how to, ...I'll test it for you

Back to top