Tag: cheek color


Look Perfectly polished in nothin’ but the basics.

April 15th, 2014 — 6:02pm

MicheleAlvez_makeup_basics


Every season, fashion and beauty magazine editors and bloggers ask me “ What are the top 5-10 things every woman must have in her makeup bag?”

My answers vary slightly, depending on the age of their readership, but overall I’m known to favor keeping makeup rather simple and timeless.  To me it’s always been about enhancing ones’ features, which can be done with just a few simple products.

Please don’t mistake my short list of musts for a lack of support for those of you who want to experiment with wild eyeliner hues and bold, trendy lip color. I’m a big fan of that sort of thing, as well. But first I think it’s important to iron out the basics, and find what works best to enhance your favorite features, keeping your every day look as fresh-faced and minimally made up, as possible.  Once that’s established, playing with extras is a breeze.

In writing this post, I’m assuming you’ve gotten your skin care regimen down, and are starting with hydrated, nourished faces. This is not such an easy feat for so many of us, and if you’re having difficulty in this venue, the good news is, there are countless treatment options in the green beauty world for every skin type. It just takes some research and often a bit of trial and error.

So… what do I think no woman should live without (I really don’t feel that you couldn’t live without makeup – or things in general – but I think you know what I mean).

  1. A good eyelash curler. My favorite has been the one by Shu Umera because of the texture and shape of the pad, and overall shape and sturdiness of their handle and the part into which the pad fits.
  2. A creamy, neutral eyeliner. Depending on your hair and eye color, as well as your skin tone, and personal preference, this could be a pale taupe, a deep brown, a medium gray, or a deep, dark black.  Keep some cotton swabs on hand to smudge the line you draw, buffing it out ever so slightly.
  3. A mascara that gives the look you favor, whether that’s longer, thicker, darker, or all of the above. (I prefer all of the above)
  4. Tweezer. I can’t emphasize the benefit of a good tweezer enough. Shaping your brows and whisking away unwanted hairs from other regions of the face where they begin to show up – it’s  a necessity.  I’ve been a fan of  the Rubis for years, but it’s really all about finding one that feels right in your hand.
  5. Two cheek colors: one that makes you look warm and glowy, and one that mimics the color your cheeks turn when your heart rate has been pushed. I generally favor creamy cheek colors, but this is a personal preference thing.
  6. Two concealer shades: one with a bit more peachy/orange undertone to cut the purple inherent in under eye circles.  Then, one concealer that matches your skin tone and texture perfectly to cover spots as needed. I always like to finish a concealer/tinted moisturizer/ foundation application by pressing a slightly dampened beauty blender sponge into the skin to ensure that the texture of the product matches the texture of your skin. Don’t skip this step if can help it.
  7. 3 lip colors. Most women I know have many more than this, but honestly, if you have limited funds, a desire to keep your purse as light as possible, or become overwhelmed at the thought of keeping up with lip trends, three shades is perfect. I’d start with a sheer, tinted lip balm in a color that’s pretty similar to your lips, add a similar shade in a proper lipstick formulation that’s somewhere in the satin range – moist, not matte, yet not glossy, and finally, a color that you love, and that gets smiles from others when you wear it – could be a bright pink, an orangey red, or a deep berry.
  8. A sheer gloss. I lied – having a fourth lip product that feels good and has a bit of a moist look is always a good idea. This can be layered over any of the above, or worn alone when you’re feeling glossy.
  9. An eyebrow brush/pencil/powder/gel: When we’re young, our brows are usually at their fullest. You may want to brush them into a lovely shape in the morning and forget about them. As we age, however – even as early as in our early 30’s, our brows may start to look a bit less full, particularly towards the tails. Finding a brow pencil or powder that looks super natural is the way to go. Light strokes, mimicking the hair growth pattern is all you need, along with good lighting, to create a frame for your face. I’ve just recently found Eco Brows, a richly pigmented brow gel product in a pot, and really like it. I also love the fine point and ease of use of the brow pencils from MAC.

There you have it.

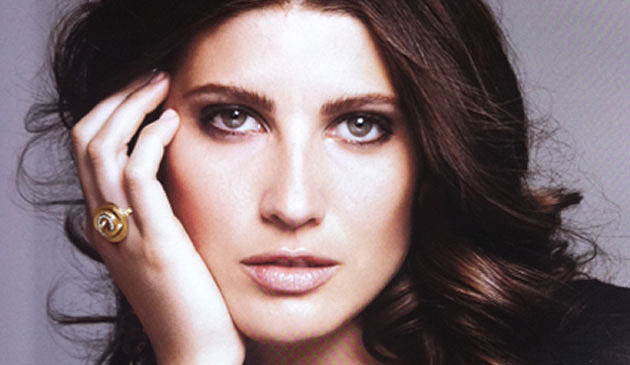
Here are some of my current favorite all natural products you can use to create this very pretty, basic look I did on my friend, the gorgeous model, Michele Alvez:

Comments Off on Look Perfectly polished in nothin’ but the basics. | ...Here's how to

many of you have written: what’d you use on her lip? i need that red!

November 27th, 2013 — 4:10am

redlips+cheekblog

Honestly, it hasn’t been me always pushing for the red lip and soft cheek color you’ve seen me do for so many of my clients… although I do love the look. I mean, look how gorgeous Sarah Silverman was when sporting the matte, intensely bright, yet sheer pop of color I chose for her. Olivia Munn’s smile was overwhelmingly beautiful when I painted it a bold blue red with a hint of creamy shine. Then there’s Selena Gomez who I gave a number of intensely pigmented creamy layers of matte orange-red crayon, and then topped them with a strategically placed highlight color in the middle of her bottom lip and just under her cupids bow that kept her radiant as she smiled, talked, and sang her heart out.  Nope, it’s by far the most frequently requested look for red carpet events by the beautiful women who will be wearing them.

I can’t tell you how many inquiries I get from you wonderful folks who follow my blog/facebook/twitter/instagram, as well as from beauty editors at all of our favorite magazines and blogs, asking me to share which products I use for the perfect red lip of all finishes and intensities. With that said, I feel that the time has come for me to give you a quick run down of some of my current favorite red lip products. Red lips can be the thing that takes your look from au natural to va va voom, and your confidence level from blah to bold.

These are things I’ve learned that i’d like to pass along to you that will help you make the most of your painted lips:

  1. Always make sure you’ve exfoliated your lips, especially the inside part of your bottom one. The best time to do it during or after a warm shower, and the best way to do it is to use a soft toothbrush, a soft washcloth, a makeup wipe, or even the pad of your finger (really only works when you’ve been in the shower for a bit). Gentle little circles, and never harder than you’d scrub an overripe tomato.
  2. Use a lip liner if you want a more precise edge, if your lipstick tends to bleed into the lines around your lips, or if you’re a lip licker and your color tends to fade quickly. The harder wax formula of a liner will help your lipstick stick around longer. I haven’t found any lip liners in the green beauty world that are intensely red (if you know of some, please let me know!), and my go-to’s are always usually Cherry and Brick, from MAC.
  3. Once you’ve finished applying your color, place a q-tip between your lips, with the tip of the swab side touching your front teeth, parallel to the floor. Form a kiss shape with your lips around the qtip and gently drag it out of your mouth, allowing it to pass along the inner parts of your lips, to remove any excess color that would otherwise have set up camp on your teeth. (aack!)
  4.  Bring the lipstick with you, along with a tinted lip balm, or even just a regular old clear lip balm. In case you don’t have a chance (or the interest) to check your lipstick every so often, re-moisturizing with a corresponding shade of tinted lip balm can help keep the color even and crack-free.

Ok, so which products can you turn to if you want to recreate the above looks that I did?

On Sarah:

A light application, applied with your finger, of OCC lip tar, in NSFW, and into your purse slide a  Rose tinted lip balm from Burt’s Bees for touch ups.

On Olivia:

A number of good thick swipes of Ilia’s Wild Child lipstick and top it with Ilia’s Crimson and Clover tinted lip conditioner.

On Selena:

There’s a lot going on in a lip color like this. I love to mix and blend and create depth by using different shades and textures, but you could certainly create a similar look with fewer products   From BITE beauty, a thick swipe or two of the crayon called Poppy as your base, a light tapping of Bite Beauty’s Pomegranate crayon along your lips, and finish by pressing either a lip brush, or your finger, coated with Red Apple Lipstick in Sunkissed (a bright orange) into the center of your bottom lip, and along the under side of your cupids bow for a little highlighty gleam action. If you didn’t want to go the green products route, you’ll find a similar color lipstick from MAC called Ruby Woo.

There is no wrong time to wear a lip color that makes you feel good, and no matter what size your lips are, how ‘bad’ you are at makeup, or because you’ve never done it before, you should try out a red lip at least once in your life. Find one that YOU like and then parade around in front of family, friends, and strangers, and see what kind of reaction you get. So listen, if you decide to rock an intense red lip to the thanksgiving dinner table tomorrow night, just remember:  you can check the status of your application by angling your knife just-so, as you’re cutting the veggies on your plate, and no one will be the wiser.

Kisses!


Comments Off on many of you have written: what’d you use on her lip? i need that red! | ...We're all connected

Get The Look Numero Uno: Sheer taupe eye with a 2-dimensional red lip = Shazaam!

August 20th, 2012 — 8:02pm


Today marks the start of a beautiful partnership.  Spirit Demerson, founder and owner of Spiritbeautylounge.com, the wonder woman who introduced me to so many fantastic green lines of makeup and skin care, and I, are teaming up to bring you ‘get the look’ blog posts.

I do the makeup while on a photo shoot, take the model’s picture at lunchtime, and send it off to Spirit to pair it with images of the products I used. Hallelujah!  This will make it so easy for you to quickly ‘get the look’, because you’ll be able to see the exact products I used, read how I used them, and click on the link to Spirit’s site to buy them. Couldn’t be easier.

To kick things off, please allow me to present the lovely Canadian model, Marla Boehr.

I prepped her skin by massaging in a few drops of Ila Rose Oil to combat the in-flight dryness I saw around her eyes, nose, cheeks, and mouth (She’d just flown in from Canada).

On her skin:
On her t-zone I sparingly pressed liquid foundation from Vapour Organic Beauty in number 125 and to make the finish look like bare skin, I lightly pressed it in with a slightly dampened beauty blender sponge.

On her eyes:

1. All over the eye area I pressed Kjaer Weis’s charmed shadow in a very sheer application with a medium domed brush. I blended it from the lid up all the way to her brow, sheering it out the further away from her lid I got. I swept some underneath her bottom lashes from edge to edge, as well.

In the crease of her eye I pressed a more tightly-domed shadow brush topped with  Kjaer’s shadow, Wisdom, and used a fluffier domed shadow brush to really blend it into the crease. I took what was left of the shadow on the tightly-domed brush and concentrated the placement of it under the iris, while using a cotton swab to barely blend it towards the edges.

In the inner corner of her eyes I pressed Kjaer’s shadow, Cloud Nine, which really made her eyes pop.

On her cheeks:

2. Onto a soft-tipped fluffy, but not densely packed brush, I blended together Ilia’s ‘All Of Me’ and ‘I Put a Spell on You’ and swirled it onto the apples of her cheeks. I used the same sponge I used on her t-zone to gently blend out the edges.

On her lips:

3. & 4. I used a combination of Ilia’s ‘Femme Fatale’ and Vapour Organic Beauty’s ‘Siren Ravish’ lipstick.  I first pressed Siren Ravish into her lips, and had her mash her lips together to really stain them. Then I applied Femme Fatale with a brush over top of the deeper shade, Ravish, and had her press her lips together a few times to really combine the colors.  I finished the application by gently tapping the pads of my fingers over her lips to soften the texture. Combining the two shades on the lips in this way creates a real depth to the mouth and wears wonderfully.

Finally, these are not products that Spirit has in her online boutique, as they’re not ‘green’, but I really like how they look and haven’t found an alternative that I like quite as much.

On her brows:

I used Laura Mercier Brunette Brow Pencil and Paula Dorf Brow Powder in Neutral

On her lashes

I used Covergirl Lash Blast in very black – very sparingly on top and bottom.

I’ll be testing out using different cameras for these how-to’s. This one was taken with my cracked-screen iPhone, which I think will be going into retirement.  Regardless, Marla rocked this look incredibly well and everyone on set loved it. Note: We were shooting clothes for the Fall, when lip color gets more deep and eyes become a little more intense. Try a purple, a burgundy or a brownish-red this Fall and you’ll be totally on-trend.

Comments Off on Get The Look Numero Uno: Sheer taupe eye with a 2-dimensional red lip = Shazaam! | ...Here's how to

Back to top