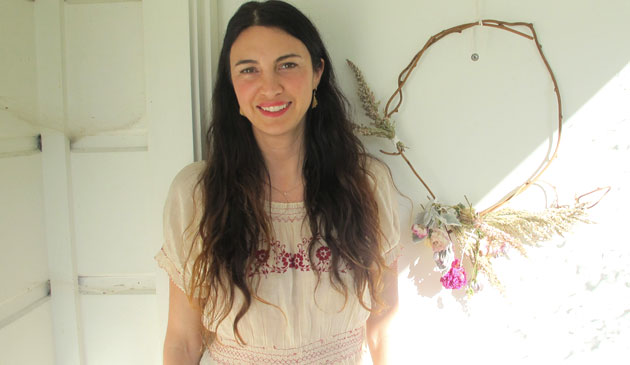
Tag: blush


Pretty makeup, that’s what they want.

June 16th, 2016 — 12:50am

christina3  christina1

‘I want my makeup to feel light, look glowy and sheer, and basically, just make me look like the best version of myself’.

Unless I’m doing makeup for an editorial, 90% of the time this is what I hear from the person I’m about to make up.  It’s come to be my favorite kind of makeup look to create, in large part because I love watching my clients reaction when I’m finished. Who doesn’t like to make people feel good about themselves? It may be a superficial ‘feel good’ at first, but it seeps in. I watch moods change, frown lines soften, and interactions with others become lighter and more at ease.  Makeup really is transformative, and it doesn’t need to be heavy anywhere on your face, contrary to the heavy eye and brow makeup and pancake face with highlights and lowlights and contour and strobe trend that just won’t seem to go away.

This is what I used for this light and glowing makeup on the beautiful Anna-Christina Schwartz:

Skin:

May Lindstrom Jasmine Garden Facial Mist– the scent is incredible and I use it as much for the aromatherapy for myself, as I do for my clients.

Biossance ‘The Revitalizer’ – a super light squalene moisturizer that’s good for all skin types.

Kjaer Weis Foundation – I use a fluffy eyeshadow brush to gently buff the cream into skin – the smallest amount around her nose, on her forehead, and around her eyes, patting it in with a damp beauty blender.

RMS Living Luminizer – not a surprise, I love to use this coconut oil based highlighter on the cheekbones, along the bridge of the nose, and the cupids bow.
Eyes:

I lined her eyes gently with cream shadow sticks from Ilia Beauty, in a gold/brown called ‘Age of Consent’, and a bit more heavily with ‘You Spin Me Round’ – a dark gray/black shade. I blended them in with a cotton swab so they melted into the lash line – both top and bottom.

Ilia Polka Dots and Moonbeams luminizer – I press this more dense, less emollient (than the living luminizer from RMS) highlighter into the inner corner of eyes to draw attention and make eyes dazzle even more.

I always curl the lashes at least once, focusing on getting that outer corner UP! It really makes eyes stand out. Two or three coats of a very black mascara on top, and one slight coat on the bottom lashes finishes the look.

Brows: Eco Brow in ‘Sharon’ lightly filled in her brows, and I used a cotton swab to ensure no hard edges. I brushed her brows up and held them in place with a little liquid (non-aresol) hairspray from Rahua on a spoolie brush.

Cheeks:

I usually use cream products that I swirl on the apples of the cheeks, but for this look I experimented by mixing a powder blush with a powder bronzer. For this I used ‘Blushing Rose’ and ‘Soft Terracotta’ from Dr. Hauschka and a medium sized fluffy brush.

Lips:

Gressa Skin ‘Bare’ Lip Boost over a bit of balm from R.L Linden. 

Comments Off on Pretty makeup, that’s what they want. | ...Here's how to

Look Perfectly polished in nothin’ but the basics.

April 15th, 2014 — 6:02pm

MicheleAlvez_makeup_basics


Every season, fashion and beauty magazine editors and bloggers ask me “ What are the top 5-10 things every woman must have in her makeup bag?”

My answers vary slightly, depending on the age of their readership, but overall I’m known to favor keeping makeup rather simple and timeless.  To me it’s always been about enhancing ones’ features, which can be done with just a few simple products.

Please don’t mistake my short list of musts for a lack of support for those of you who want to experiment with wild eyeliner hues and bold, trendy lip color. I’m a big fan of that sort of thing, as well. But first I think it’s important to iron out the basics, and find what works best to enhance your favorite features, keeping your every day look as fresh-faced and minimally made up, as possible.  Once that’s established, playing with extras is a breeze.

In writing this post, I’m assuming you’ve gotten your skin care regimen down, and are starting with hydrated, nourished faces. This is not such an easy feat for so many of us, and if you’re having difficulty in this venue, the good news is, there are countless treatment options in the green beauty world for every skin type. It just takes some research and often a bit of trial and error.

So… what do I think no woman should live without (I really don’t feel that you couldn’t live without makeup – or things in general – but I think you know what I mean).

  1. A good eyelash curler. My favorite has been the one by Shu Umera because of the texture and shape of the pad, and overall shape and sturdiness of their handle and the part into which the pad fits.
  2. A creamy, neutral eyeliner. Depending on your hair and eye color, as well as your skin tone, and personal preference, this could be a pale taupe, a deep brown, a medium gray, or a deep, dark black.  Keep some cotton swabs on hand to smudge the line you draw, buffing it out ever so slightly.
  3. A mascara that gives the look you favor, whether that’s longer, thicker, darker, or all of the above. (I prefer all of the above)
  4. Tweezer. I can’t emphasize the benefit of a good tweezer enough. Shaping your brows and whisking away unwanted hairs from other regions of the face where they begin to show up – it’s  a necessity.  I’ve been a fan of  the Rubis for years, but it’s really all about finding one that feels right in your hand.
  5. Two cheek colors: one that makes you look warm and glowy, and one that mimics the color your cheeks turn when your heart rate has been pushed. I generally favor creamy cheek colors, but this is a personal preference thing.
  6. Two concealer shades: one with a bit more peachy/orange undertone to cut the purple inherent in under eye circles.  Then, one concealer that matches your skin tone and texture perfectly to cover spots as needed. I always like to finish a concealer/tinted moisturizer/ foundation application by pressing a slightly dampened beauty blender sponge into the skin to ensure that the texture of the product matches the texture of your skin. Don’t skip this step if can help it.
  7. 3 lip colors. Most women I know have many more than this, but honestly, if you have limited funds, a desire to keep your purse as light as possible, or become overwhelmed at the thought of keeping up with lip trends, three shades is perfect. I’d start with a sheer, tinted lip balm in a color that’s pretty similar to your lips, add a similar shade in a proper lipstick formulation that’s somewhere in the satin range – moist, not matte, yet not glossy, and finally, a color that you love, and that gets smiles from others when you wear it – could be a bright pink, an orangey red, or a deep berry.
  8. A sheer gloss. I lied – having a fourth lip product that feels good and has a bit of a moist look is always a good idea. This can be layered over any of the above, or worn alone when you’re feeling glossy.
  9. An eyebrow brush/pencil/powder/gel: When we’re young, our brows are usually at their fullest. You may want to brush them into a lovely shape in the morning and forget about them. As we age, however – even as early as in our early 30’s, our brows may start to look a bit less full, particularly towards the tails. Finding a brow pencil or powder that looks super natural is the way to go. Light strokes, mimicking the hair growth pattern is all you need, along with good lighting, to create a frame for your face. I’ve just recently found Eco Brows, a richly pigmented brow gel product in a pot, and really like it. I also love the fine point and ease of use of the brow pencils from MAC.

There you have it.

Here are some of my current favorite all natural products you can use to create this very pretty, basic look I did on my friend, the gorgeous model, Michele Alvez:

Comments Off on Look Perfectly polished in nothin’ but the basics. | ...Here's how to

many of you have written: what’d you use on her lip? i need that red!

November 27th, 2013 — 4:10am

redlips+cheekblog

Honestly, it hasn’t been me always pushing for the red lip and soft cheek color you’ve seen me do for so many of my clients… although I do love the look. I mean, look how gorgeous Sarah Silverman was when sporting the matte, intensely bright, yet sheer pop of color I chose for her. Olivia Munn’s smile was overwhelmingly beautiful when I painted it a bold blue red with a hint of creamy shine. Then there’s Selena Gomez who I gave a number of intensely pigmented creamy layers of matte orange-red crayon, and then topped them with a strategically placed highlight color in the middle of her bottom lip and just under her cupids bow that kept her radiant as she smiled, talked, and sang her heart out.  Nope, it’s by far the most frequently requested look for red carpet events by the beautiful women who will be wearing them.

I can’t tell you how many inquiries I get from you wonderful folks who follow my blog/facebook/twitter/instagram, as well as from beauty editors at all of our favorite magazines and blogs, asking me to share which products I use for the perfect red lip of all finishes and intensities. With that said, I feel that the time has come for me to give you a quick run down of some of my current favorite red lip products. Red lips can be the thing that takes your look from au natural to va va voom, and your confidence level from blah to bold.

These are things I’ve learned that i’d like to pass along to you that will help you make the most of your painted lips:

  1. Always make sure you’ve exfoliated your lips, especially the inside part of your bottom one. The best time to do it during or after a warm shower, and the best way to do it is to use a soft toothbrush, a soft washcloth, a makeup wipe, or even the pad of your finger (really only works when you’ve been in the shower for a bit). Gentle little circles, and never harder than you’d scrub an overripe tomato.
  2. Use a lip liner if you want a more precise edge, if your lipstick tends to bleed into the lines around your lips, or if you’re a lip licker and your color tends to fade quickly. The harder wax formula of a liner will help your lipstick stick around longer. I haven’t found any lip liners in the green beauty world that are intensely red (if you know of some, please let me know!), and my go-to’s are always usually Cherry and Brick, from MAC.
  3. Once you’ve finished applying your color, place a q-tip between your lips, with the tip of the swab side touching your front teeth, parallel to the floor. Form a kiss shape with your lips around the qtip and gently drag it out of your mouth, allowing it to pass along the inner parts of your lips, to remove any excess color that would otherwise have set up camp on your teeth. (aack!)
  4.  Bring the lipstick with you, along with a tinted lip balm, or even just a regular old clear lip balm. In case you don’t have a chance (or the interest) to check your lipstick every so often, re-moisturizing with a corresponding shade of tinted lip balm can help keep the color even and crack-free.

Ok, so which products can you turn to if you want to recreate the above looks that I did?

On Sarah:

A light application, applied with your finger, of OCC lip tar, in NSFW, and into your purse slide a  Rose tinted lip balm from Burt’s Bees for touch ups.

On Olivia:

A number of good thick swipes of Ilia’s Wild Child lipstick and top it with Ilia’s Crimson and Clover tinted lip conditioner.

On Selena:

There’s a lot going on in a lip color like this. I love to mix and blend and create depth by using different shades and textures, but you could certainly create a similar look with fewer products   From BITE beauty, a thick swipe or two of the crayon called Poppy as your base, a light tapping of Bite Beauty’s Pomegranate crayon along your lips, and finish by pressing either a lip brush, or your finger, coated with Red Apple Lipstick in Sunkissed (a bright orange) into the center of your bottom lip, and along the under side of your cupids bow for a little highlighty gleam action. If you didn’t want to go the green products route, you’ll find a similar color lipstick from MAC called Ruby Woo.

There is no wrong time to wear a lip color that makes you feel good, and no matter what size your lips are, how ‘bad’ you are at makeup, or because you’ve never done it before, you should try out a red lip at least once in your life. Find one that YOU like and then parade around in front of family, friends, and strangers, and see what kind of reaction you get. So listen, if you decide to rock an intense red lip to the thanksgiving dinner table tomorrow night, just remember:  you can check the status of your application by angling your knife just-so, as you’re cutting the veggies on your plate, and no one will be the wiser.

Kisses!


Comments Off on many of you have written: what’d you use on her lip? i need that red! | ...We're all connected

Look perfectly polished and gorgeous…

October 31st, 2013 — 10:31pm

Back in March I spent the afternoon with Shiva Rose in her spectacular Venice Beach home. Shiva has a really fun, informative, and aesthetically beautiful blog called The Local Rose, where she writes about living her best green life, and others living theirs.

I love Shiva’s vibe.  In her backyard there were the most vibrantly colored chickens (or were they hens or roosters? Why don’t I know the difference?) running around, and her house was that perfect blend of styles: relaxed bohemian, mid-century modern, rustic, and multi-cultured. (I immediately started daydreaming about moving in and throwing parties to show it off).

Shiva’s beautiful and talented daughter shot a little video of us as I gave Shiva a face oil massage with a delicious oil from La Bella Figura, taught her how to use her eyelash curler to its fullest potential, an then gave her a little makeover using products from an all –green makeup line called W3LL People.

Thanks again, Shiva. When can we film episode two (or at least just hang out again?) I’m back in LA!

product_shot_shiva_blog


shiva_blog


Comments Off on Look perfectly polished and gorgeous… | ...Here's how to

Get this sultry yet understated eye & glowing skin I created for Olivia Wilde last night

April 6th, 2013 — 4:00pm

blog_Olivia_Wilde_DVF_Awards2013

Every year the iconic designer, Diane Von Furstenberg, throws an awards event to provide recipients with the exposure and resources needed to extend their critical efforts on behalf of women’s causes. Four individuals are honored who have displayed leadership, strength, and courage in their commitment to their causes, and this year, the beautiful Olivia Wilde was a presenter. I’m always happy to get clients ready for a red carpet event, but when it’s for a cause that’s so near and dear to my heart, it makes it all the better for me.

When I got to Olivia’s apartment about two hours before she had to leave for the event, she showed me the gorgeous black pants suit she and her stylists had chosen, and said: “I don’t know, I was thinking we should play up my eyes”.  On my way to her place I’d been looking at photos of her from previous red carpet events -which I do before meeting with every client – to see which looks I liked her in the most. Olivia usually goes for a dramatic black liquid cat-eye or a rounded, very intense dark smokey eye, and in the moment she said “let’s play up my eyes”, what felt like 500 images of fun things I could do flooded my head. As her hairstylist began running mousse through her hair, I stood staring at the shadows and liners I’d laid out on her dining room table, trying to decide which colors to swirl around her eyes, and in what shape.

I knew I needed a minute to come to a decision, so I did what I usually do, and started with a face oil massage to get her circulation going, and to zone out on her face while she had her eyes closed. Within seconds it came to me, and I saw the completed look in my head, even before the oil had time to absorb.

The glowing skin is ultimately courtesy of Olivia’s genes, of course, but I also always give a lot of credit to the base layer of hydration I lay down before I draw and paint on the skin, and in this case, Lina Hanson Global Face Serum made for a truly glowing-from-within look. Plus, the aromatherapy this oil provides to my clients (and to me) during the face massage has made it a mainstay in my kit (and my medicine chest). The scent is incredible, and the viscosity is perfect.

As for her beautiful eyes: I used three simple products:

  1. a pale, sheer shimmery slate gray,
  2. a medium dark matte smokey graphite gray, and
  3. a black creamy eyeliner.

First I mapped out the overall shape I wanted using the pale gray. On top of that I precisely placed the medium/dark matte gray along the crease and outward, extending slightly up from the outer corner of her eye, and then I blended the hell out of it so there would be no apparent edge between the two shades. Then I went in with a black liner and thoroughly applied it on the inner rim of top and bottom lid, as well as dotted in between lashes. To complete the look I smudged it into the lash line on both bottom and top lid using a smudge brush.

I really love how this look turned out… and it’s just like I saw it in my head during the face oil massage!

One final note: since everyone always wants to know the answers to these two questions about my clients,  I will tell you: Olivia is incredibly nice, and super beautiful in person without a lick of makeup.


Comments Off on Get this sultry yet understated eye & glowing skin I created for Olivia Wilde last night | ...Here's how to

show the world that less is more: super basic makeup 101.

December 24th, 2012 — 5:12am

miniblog

photo: Tim Bell

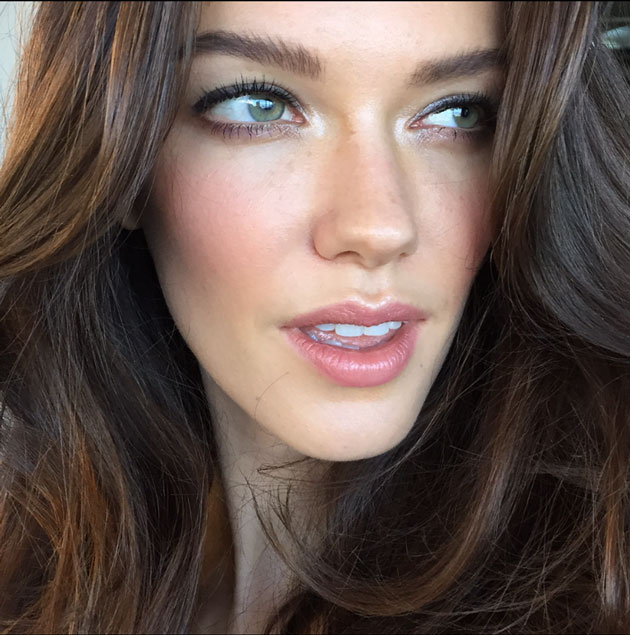
This is my beautiful friend, Mini Anden.  To have a conversation with her, you’d have no idea she was born and raised in Sweden because she doesn’t have a trace of an accent. We’ve known each other for a number of years now, and I absolutely adore her. She’s really intelligent, we have the same sense of humor   (I love it when she cracks us both up while I’m doing her makeup), and she’s a great listener and advice-giver. All of that mushy stuff aside, she’s an incredible model, and at just under 6 ft tall with a body that she subjects to intense workouts including a fusion of pilates and boxing known as piloxing (she has serious abs that I’ve actually tried punching just to see how strong they are – and they kinda hurt my hand!), she’ll have a career in front of the camera for as long as she wants.

She’s also a totally natural beauty. I really prefer how she looks mostly bare-faced, unless she’s been made up for an editorial photo shoot in a magazine with really intense makeup. Her eyes are incredibly blue, in that almost unreal, is-she-wearing-colored-contacts? way.  She’s also a perfect freckle-face, with tons of cute dots all over, although the size of this photo doesn’t let you see just how intense they are.

We shot the photo above after a long day on set, after she’d taken off most of the makeup I’d put on her for the day’s shoot. As you likely know from the makeup I do, I like to accentuate the beauty that already radiates from each woman, rather than drawing her a new face on top of the one that exists. In Mini’s case, I wanted to show how just a little eye makeup and slight skin perfecting makes for a polished look.

We did a very basic touch up before putting her in front of a window, against a white wall with no fancy lighting or makeup tricks used.

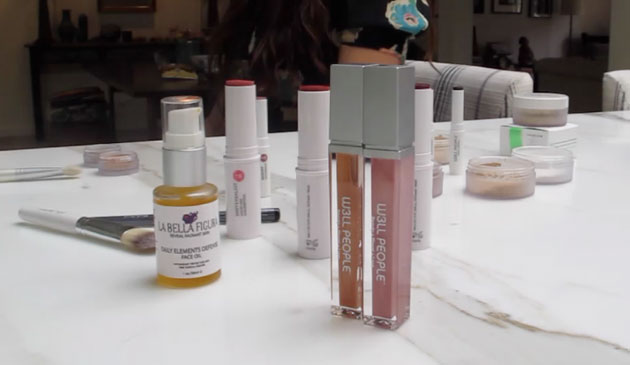
The products I used were:

Toning Mist, Kahina Giving Beauty: I had Mini close her eyes, and on her freshly washed face, I generously sprayed this mist to help replenish moisture and calm her skin.

Facial Lotion, Kahina Giving Beauty: I’d already given Mini a face massage with oil earlier in the day, so for this photograph I opted to use a less dew-inducing option, while still offering great hydration.

Shu Uemura Eyelash Curler:  I know many people are scared to curl lashes once they’ve been coated with mascara, but if you do it carefully, and just barely tap the curler when you’re holding it just at the root, you’ll be fine. NO TIGHT SQUEEZING here, please. You’ll take off the mascara where the metal touches your lashes and have a blank space that no amount of recoating will really help cover.

‘Cloud Nine’, Kjaer Weis Eye Shadow: This is one of those really flattering (for fair to medium complexions) champagne/ivory shades with a pearly finish that does a great job of illuminating the eye without leaving behind those horrible bits of glitter. Using this MAC brush I like to place the eyeshadow in the inner corners of the eye, in the very center of the lid, and trace a bit underneath the bottom lashes. I then use my clean finger tip to gently blend the shadow into the skin in the inner corner, and generally I’ll use this brush from Laura Mercier to buff the shadow into the lid.

Black Eyeliner, Vapour Organic Beauty:  Just a light smudge of an eyeliner swiped and pressed into the under side of the outer edge of the top lashes, and then wiggled in between the lashes, and maybe even just a teeny bit smudged on top of the outer edge of the upper lash can do a lot to emphasize the eye without making it look made up.  Depending on the shape and color of your eye, you might find your eye looks best with the entire inner rim lightly darkened, but for most almond shaped eyes, accentuating the outer upper lash line is just enough.  You can try this look with a brown, gray, taupe, or even purple or navy liner to see which you like best.  Different colors will accentuate your eye color ; for me a dark purple liner will not so much read as ‘she’s wearing purple!’, but will simply make the green of my hazel eyes pop.

Very Black, Lash Blast Mascara by Covergirl: I love dark black lashes, even if it’s just a light coating. As I’ve said countless times, this mascara is super black (whereas so many others are more of a light black, almost gray), and can be layered for a more intense look. If you read my blog because you’re looking for only ‘green’ beauty recommendations, I apologize – this isn’t one of them!

Concealer, Mineral Fusion: I like these concealer duos because similarly to the much acclaimed Laura Mercier secret camoflauge duos, you can blend different amounts of the two colors together to get the exact shade you need for the specific part of your face on which you’re laying the product. Under your eye, for example, you’ll want to use a high concentration of a peach/orange concealer to combat the purple – trust me, it totally works. I’ve used straight orange pigment to cover super dark circles under the eyes of women with very deep complexions with great success. Then you blend the more skin-colored shade over top and pat with your ring finger to create a seamless cover on the skin.

On most faces I concentrate on coverage under the inner 1/3 of the eye (never put concealer under the outer 1/3 of the eye unless you want to accentuate your fine lines and wrinkles!), underneath, and around the outer edges of the nostrils, and on any spots or redness/discoloration you may have, but only if you ensure you’ve blended both the color and texture into your skin so that you’re not just highlighting the spot.  For small blemishes, using a really tiny brush like this with a concealer that matches your skin exactly can be helpful.

Bone Beige, MAC sculpting powder: I often swirl this underneath and on to cheekbones as a sculpting powder and I like it, as well, as a non-shimmering bronzer. On Mini, I lightly underlined her cheekbones with Bone Beige using this contour brush.

Freja, Luminous Shimmer Blush, by Alima Pure: I’m usually against products with particles of glimmer, but in this case, they’re really very small, and the color and glimmer combine nicely to give a very-barely-there-pink to the apple of the cheek.

Honey Lip Balm, Burts Bees: Mini put this on herself, as per usual. Ever since I can remember, I’ve seen Mini with this little yellow tube in her pocket, purse, or hand. I can honestly say, it does her lips right, and I’ve never seen them chapped!


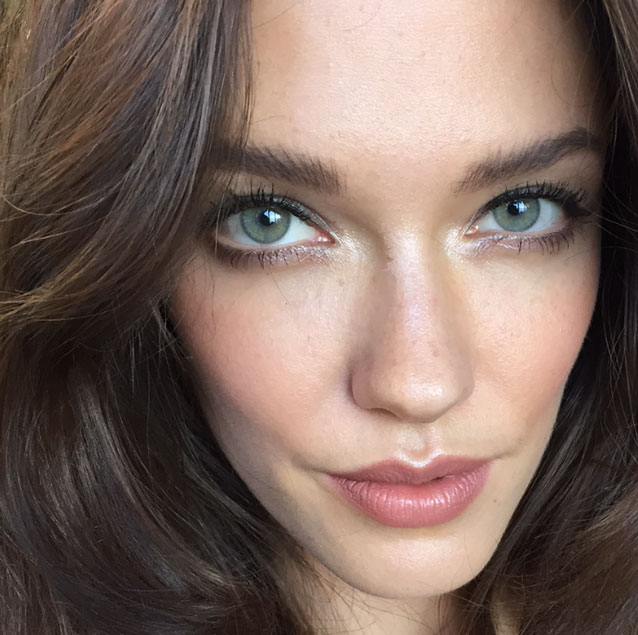
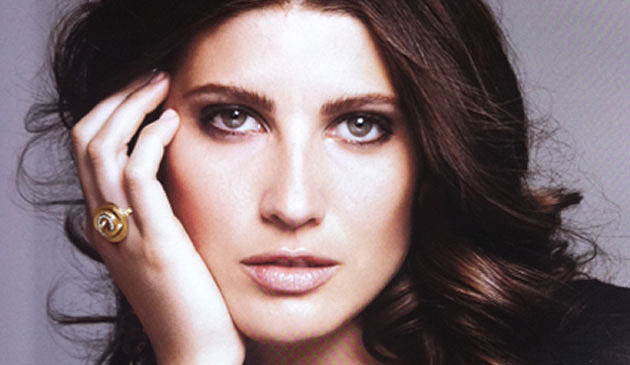
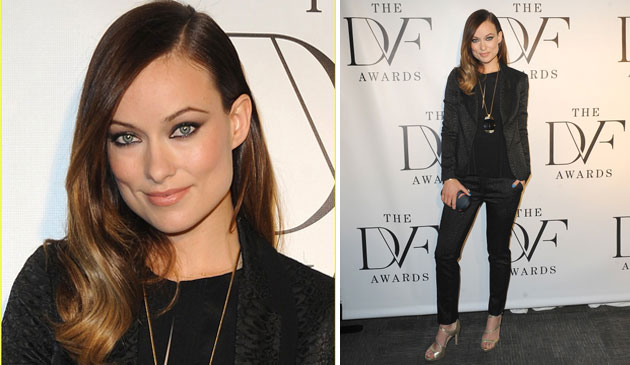
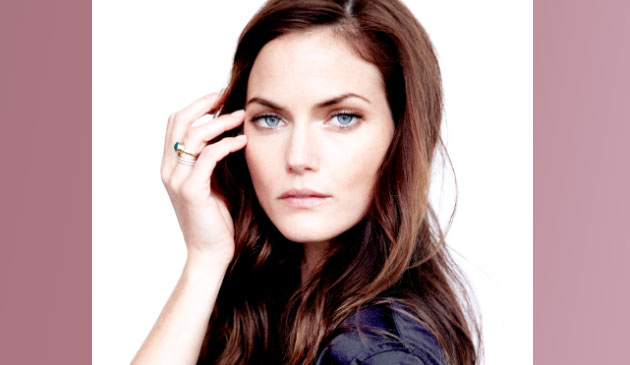
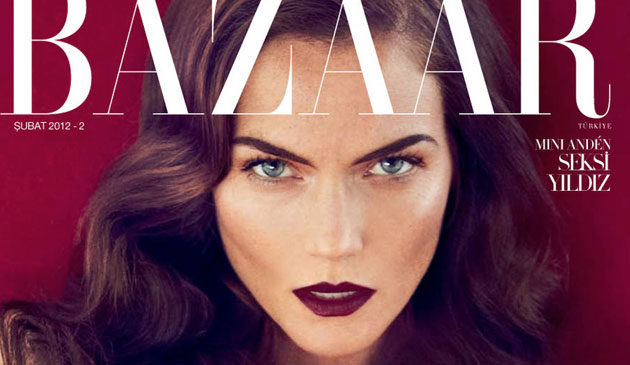
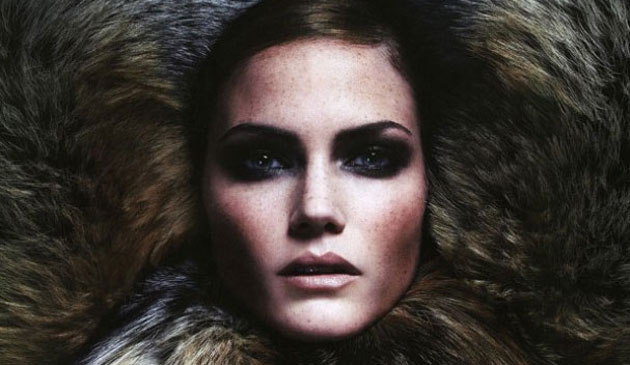
Just for fun, here are two shots of Mini that I love that really show how transformative a little makeup/hair/styling can be. Note her dark eyebrows in the first one. They look incredible for this photo, but would look shocking if you ran into her at the grocery store looking like that.

minibazaar

minifur

minisisley


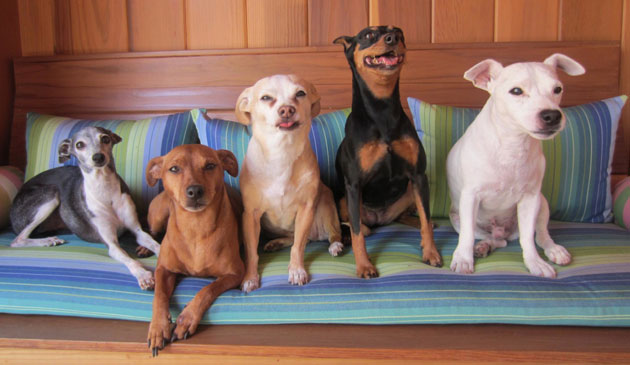
One last endearing thing I’ll leave you with about Mini is that she and her husband, Taber, have a house full of dogs. Mini tweets pictures of them in various positions that make me laugh and laugh. I took an immediate liking to Gus, the skinniest, long-nosed munchkin in the center of the first photo; i think it’s because we resemble one another.

minipupsinsunshine minicincodemayopup minipupsoncouch minixmaspup

Thank you, Mini, my love!!!


Comments Off on show the world that less is more: super basic makeup 101. | ...Here's how to

I love these looks I did on the gorgeous Felicity Jones: smouldering eyes, perfectly pink cheeks, sheer, natural lip color.

July 15th, 2012 — 8:51pm

Over the past few months, you may have seen this lovely English actress in all the fashion magazines as the new face in the Dolce & Gabbana ads(she nudged out the beautiful Scarlett Johansson), and pretty soon you’ll see her on the silver screen opposite Warren Beatty.  Felicity is a dream to work with. Not only is she really as sweet and funny as you’d hope she’d be, she also has a cool, defined style, yet she’ll let me play with her makeup a little bit to keep each red carpet look interesting.

This is one of those looks that works on many women, regardless of your age, skin tone, and comfort level when it comes to doing your own makeup: play up your eyes with a little smudgy liner, swipe on tons of mascara, (experiment with false lashes if you dare) and keep the rest of the face looking like you’ve just had some good exercise…or a little too much red wine: ever so slightly flushed in the cheeks. Not everyone will look right in a pink check and lip, but a similar pale shade to complement your skin tone  (could be a minimal bronzer on the cheek and a tawny lipstick if your skin tone is deeper) which shouldn’t be too hard to find.

As you know, I use a mixture of ‘green’ and mainstream products on most of my clients. As I’ve said before, I think it’s about limiting your overall exposure to certain ingredients, and if you have a specific black eyeliner that you adore that smudges just perfectly and stays put all night, then by all means, don’t feel badly about using it.

In all honesty, I don’t remember exactly which products I used on Felicity in each of these lovely images. I do know, however, exactly how I could create them using 100% good-for-you cosmetics. I love that the ‘green’ beauty products industry has come this far!

  1. Dr. Hauschka Rose Day Cream Light: For this look, a more matte complexion than what I normally like is in order. I skipped the face oil massage I usually do, and spot moisturized very lightly where needed.
  2. I love a smudgy black eye. Vapour Organic Beauty makes a deep black liner that smudges well and can be layered for intensity. I use a small blending brush to smudge the liner around, and into the lash line.  In the first photo I wet what’s called an ‘eyeliner push brush’ – a row of flat edged bristles that allows the creation of a sharp line – and dipped it into Alima Pure  Satin Matte mineral pigment eyeliner and pressed it along the outer edge of Felicity’s top lashes, creating a slight upturned cat eye.
  3. In the final photo I used a soft fluffy brush to sweep a sheer, reflective taupe shadow called ‘magnetic’ from Kjaer Weis, under her bottom lashes.
  4. In all photos, of varying degree, I swirled one of the following onto the very top of her cheek: RMS lip2cheek in ‘Smile’, Kjaer Weis cheek cream in ‘Blossoming’, and set it with one of the following: Dr. Haushka blush in Natural Pastels, Rouge Powder Duo or Korres blush in #16 Pink/Rose. . I swept the face with a large soft brush to blend the cheek color seamlessly.
  5. Felicity being a fan of a neutral or pale pink lip makes this part super simple. I love that she knows I’ll ask her if she’s exfoliated her lips when I arrive to do her makeup, and generally beats me to the punch, showing me the washcloth she’s been gently rubbing against her mouth. For the natural look she likes, try using ‘Caramel’ or ‘Strawberry’ Lip Shimmer, or ‘Honeysuckle’ tinted lip balm, both from Burts Bees, the new fuchsia lip shine from RMS Beauty in ‘Sublime’, or the Tinted Lip Conditioner from Ilia in ‘Nobody’s Baby’.
  6. I’m not usually a fan of a powdered face, but this look asks for a little powder in the t-zone. I like each of the three from Jurlique; they have different scents associated with different skin types, but with how minimally I tend to use them, I can’t say I’ve noticed any difference in performance.

In general, my favorite part of any look is the lashes. It’s fun to layer on the mascara or really play up the drama with a strip of falsies, or with a few individual clusters spaced along the outer edge of the top lid. Send me your photos via my Facebook page of how you do this type of look on yourself. I can’t wait to see!

Thank you, lovely Felicity, for wearing my art work so well.


Comments Off on I love these looks I did on the gorgeous Felicity Jones: smouldering eyes, perfectly pink cheeks, sheer, natural lip color. | ...Here's how to

Vapour Organic Beauty does it again: Chelsea’s rosy cheeks couldn’t be more perfect!

May 23rd, 2012 — 2:40pm


You know when you find a product, or a few products from one company, that with barely any effort on your part, make you look GREAT? Great, in the way that everyone who sees you asks if you’ve been on vacation, or if you’re trying something different with your hair… that way in which you look so naturally good and polished that no one can tell what’s different?

Well, Vapour Organic Beauty’s multi-use cheek and lip color has been that for me for quite some time, now.

About two years ago I was lucky enough to receive some of their best selling cheek and lip stains and multi-use cheek and lip colors. I sorted through them, picked out my favorites for me and few friends – all of us with different coloring – and immediately put Courtesan 213 on my cheeks.  I looked like I’d just been in an hour and a half yoga class – alive, glowing, and somehow peaceful and happy. That’s a lot to ask of a cheek color, but I kid you not – that’s how I felt, and as the days (and now, years) have passed, I continue to get that positive reinforcement from those around me when I wear it – so I know it’s true.

I know that many of you are hesitant to use a cream cheek color. I know this because I get emails about it, and people will often ask me when I teach classes or am interviewed for articles: how do I apply it? Will the color stay throughout the day? Will it make me break out?

All great questions, and after many years of using cream cheek colors (from NARS’ multiples to 3-custom color sheer cheek stains, to those from the natural brands that are taking the cosmetic world by storm: RMS, Kjar Weiss, Revolution Organics, Isa’s Restoratives, and of course, Vapour), I know that cheek creams across the board are my personal favorite, both for work and on my own face.

I encourage you to try it on a well moisturized face (but let your moisturizer or oil sink in for a few minutes before applying your cheek color), with clean fingers, and just press the color into the apples of your cheeks – the part that perks up when you smile. Use your fingers or a brush or a sponge to tap and blend so that you can’t see the edge where the color begins to fade off your apples. I often set the cheek color with a sheer application of a corresponding powder blush if I know I (or my client) won’t have a chance to look in the mirror to refresh. That’s the only complaint that I have heard about cream cheek colors -particularly about those from the natural brands – that color tends to fade as the day wears on. My response: it’s a good thing we carry purses! Reapplying is not a bad thing! We should be looking in the mirror half way through the day to see how we’re presenting ourselves to others, no?

On the lovely Chelsea I used a very sheer application of Vapour’s Aura Stain in ‘Impulse’, and I applied it with my fingers to her very well moisturized cheeks, and then I used a brush to blend the edges seamlessly. Impulse is a very intense color and if you apply it from the tube, or more densely with your fingers, you’re going to get a lot of color deposit. My friend came over the other day wearing it as a lipstick and it was amazing – and very intense! It’s all about how you apply it, which is cool because you can personalize it, and create different looks with the same product. Two treats (or more) in one!

I topped off the center of each cheek with the most sheer application (this time applied with a wispy brush) of Vapour’s shimmer cheek color in Whisper. As you may know, I’m not much of a fan of anything with shimmer for real life, but in photo shoots, out at night, and on the red carpet, it can look awesome when applied sparingly, and camera flashes pick it up quite nicely.

One quick story: the day I received the package from Vapour about two years ago was a long and exhausting one, but when I got home from work around 10pm, I couldn’t help but open the bag and start trying everything. By midnight I’d sampled each piece, and I found myself doing something I don’t think I’d ever done before: I looked up one of the creators on Facebook and messaged him to tell him how much I loved the products. I sent him, essentially, a love note, at 1am! After I sent it I thought: he’s going to think I’m looney. Lucky for me, he must be a night owl, because I got the nicest message in response from him – at 2:30am!  Since then, I’ve had the pleasure to have spent time with the co-founder and formulator, Kristine Keheley. She’s one of those women who knows everything about ingredients, knows how to explain what she knows for the average person,and is both scientist and artist.

It makes me feel so good to have respect for, and actually like the folks behind the brands I use.


Comments Off on Vapour Organic Beauty does it again: Chelsea’s rosy cheeks couldn’t be more perfect! | ...I'll test it for you

A youthful spirit with a face to match (& some products I use to accentuate that youth)

March 30th, 2012 — 7:52am


Susan is one of those women who is constantly busy doing interesting things, with interesting people, for interesting causes. I always learn something about the humanitarian efforts around town and around the world when I see her. I can’t say I’ve learned how to be a great ping pong player since I’ve known her, but I have tried my hand at it while at her well-known ping pong club, Spin.

One thing I have learned (through some trial and error, I’ll admit) is to use about 80% cream makeup products on Susan, relying on powder only for eyeshadow – which is always blended well and smeared along the edge with my finger or a q-tip -and the teeniest little bit of translucent powder on her T-zone to set her foundation. This months’ Allure Magazine has a great article complete with makeup tips and tricks from makeup artists on how to look your most youthful, which aren’t really applicable to the youngest models with whom I work, but for anyone in their very late twenties on up, I think these are some good rules to follow.  I see Susan again next week and I’ll try to do a different look on her and blog about it soon, complete with a product shopping list. Did I mention that my mom and Susan bear a striking resemblance to one another?

This is what I used on Susan in the picture above:

Darphin Organic Jasmine Aromatic Care Oil (Smells delicious!)

Darphin Predermine Densifying Anti-Wrinkle Cream for Normal Skin (seals in the oil I just applied)

(I allow the above to settle into the skin for a few minutes before starting the foundation)

 Armani Face Fabric Foundation, SPF 12, This stuff will not settle into fine lines. I apply it very sparingly  – starting in the middle of her face and tapering off the further I get from the center – first with Armani’s natural bristle foundation brush, and then lightly tapped into perfect submission with the Beauty Blender, a perfectly textured and shaped sponge (that was just thoroughly soaked and squeezed dry in a towel)

MAC eyeliner in Teddy – one of the best in brown/black/gold (smudge-able and long wearing). Drawn along both top and bottom lashes and dotted inside the lash line, and then smudged with a thin synthetic brush to create no hard edges.

Lancome Color Design Quad Eye Shadow in Showstopper Style (this is the best set of shadows I’ve found that works well on so many different skin tones). I generally don’t use the lightest shimmery shadow in this quad (four different eyeshadow colors in one palette) on women over 45, as the highlight in the corner of the eye often looks overdone. Instead I use the tan shimmer all over her lid but not above the crease, as well as very softly under the bottom lashes before the liner, smudged with a q-tip.

Lancome Color Design Sensational Effects Eye Shadow Smooth Hold Matte in Mochaccino, which is a soft taupe-brown, which I use lightly along the outer edge of the lashes and gently fade towards the outer corner of her lid

Cover Girl Lash Blast Mascara in Very Black – enough to seriously coat the upper lashes

Kjaer Weis Cream Blush in Blossoming (one of the most incredible all natural  – 95% organic – makeup lines on the market. added bonus: beautiful refillable containers) I like to apply with a soft synthetic brush and then blend with the sponge in small taps.

Laura Mercier Lip Liner in Baby Lips – I first line her lips, and then fill them in with the pencil to help the color stay longer and appear more intensely.

Laura Mercier Creme Lip Colour in Tea Rose

Dr. Haushka Lip Balm in a pot, applied on top for a little added shine without any of the stickiness or reflectiveness sometimes inherent in lipgloss.


Comments Off on A youthful spirit with a face to match (& some products I use to accentuate that youth) | ...Here's how to

Back to top