photos: Tim Bell
I count this multi-lingual, timeless beauty, model, attorney, farm and restaurant owner, daily blogger, and columnist for HELLO! magazine (how does she find the time??!) – Eugenia Silva – among my favorite faces to paint on, and wonderful friends. We’ve shared a lot over the years we’ve known each other, including a love for the best products. Luckily for me, she’s as excited by the green beauty industry as I am.
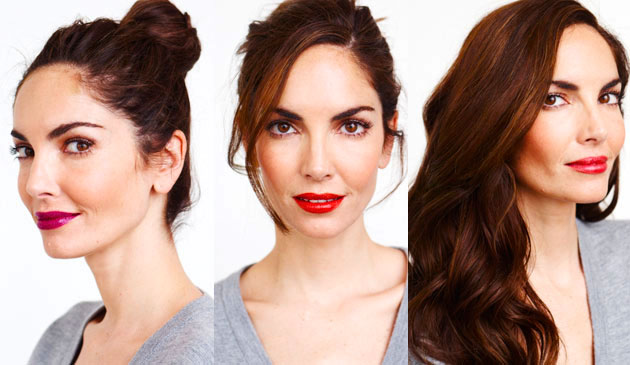
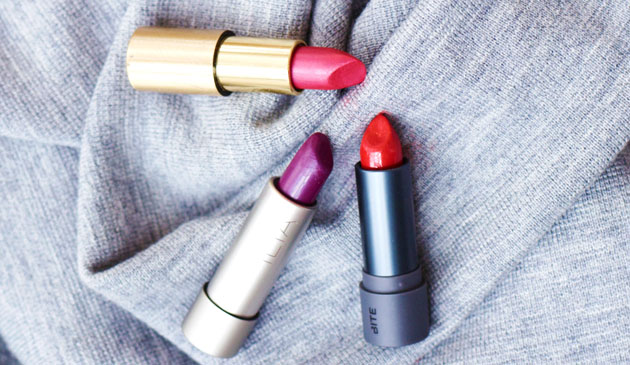
When she asked if I wanted to do a blog post together, I jumped at the chance. With plenty to pick from, Eugenia and I dug through my huge bag of non-toxic lip colors. Our oooh’s and ahhh’s were particularly loud when we came across each of these three colors pictured here. It helps that with her coloring, she can wear most shades. Side note: she did her hair changes in two seconds between shots. This chica is a serious model! After the long day of shooting advertising, Eugenia still looked wonderful, so we grabbed the fantastic photographer, Tim Bell, and within 30 minutes, our photoshoot was complete (and stunning!).
Look #1: Ilia Beauty in Ink Pot – has a silky, satin finish with just enough emollience.
Look #2: Bite Beauty in Apricot -doesn’t look like any apricot I’ve ever seen! it’s a richly pigmented orange-y red – not shiny nor matte, but the perfect blend of creamy.
Look #3: Dr. Hauschka in #13 – a very lustrous richly pigmented PINK with a modest amount of reflective particles to really make your lips shine without being glossy.
With colors so intensely pigmented, bright, and moist, application technique is important, particularly if you don’t want to have constant touch-up worries. There are lots of techniques that will help your lip color to stay strong all night, but one of my favorites (and it doesn’t necessitate finding the perfect lip liner to coordinate) is as follows:
1. Begin with moisturized lips. Now blot them with a tissue to remove any wax or oil sitting on your lip skin.
2. Using a lip brush, begin building up product by swiping both sides of the brush against the lipstick.
3. Begin by tracing the outer edge of the bottom lip with your lip brush, depositing color densely and evenly.
4. Trace the cupid’s bow (center of top lip, directly underneath the nose) with the lip brush. Stand back from the mirror and see if your top lip would benefit from being traced just slightly above the actual lip line. If you’ve never done this before, give it a try and see if you like how it looks (many of us start to lose a little fullness in our top lip in our late 20’s), and wipe it off immediately if it makes you look clownish. Finish tracing the edge of the top lip, whether inside your natural line, or just outside. Stand back from the mirror again and make sure what you’ve drawn is symmetrical, and if it’s not, try and get it as close as possible.
5. Reload your lip brush with lipstick and begin pressing the color – not dragging it – evenly into your lip. Press your lips together – don’t rub them, though. The goal is to press the pigment into your skin, which will stain it = making the color last longer.
6. Repeat step 5
7. Place a single sheet of tissue between the lips and press them together to blot – again, do not rub, only press.
8. Using a translucent loose powder, gently tap some into your palm or onto a tissue, and using your ring finger, press a very light coat onto your lips. Press your lips together one more time to bind the powder to the lipstick.
9. Finish with one more application of your lipstick. This can be done with your lip brush, with your finger – by touching the lipstick with your ring finger, and pressing it into your lips – or by tapping directly from the tube onto your lips. The point of this final step is to ensure that the intensity of color is there, and that the finish is emollient and even.
I know it sounds like a lot of steps, but I’m telling you, when you don’t want to think about retouching for hours, this is the way to go. Regardless – don’t forget to pack your lippie in your handbag. You never know what activity you might find yourself in that will smear your perfect pout. Wink wink!
Gracias, Eugenia!!!


