...Here's how to
Spotted on the runways in London and Milan: It’s all about the brow!
February 29, 2012

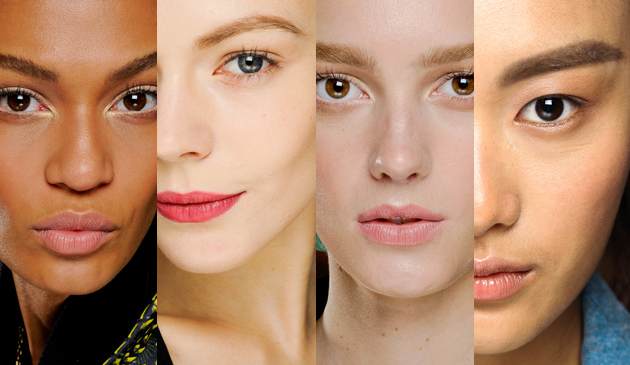
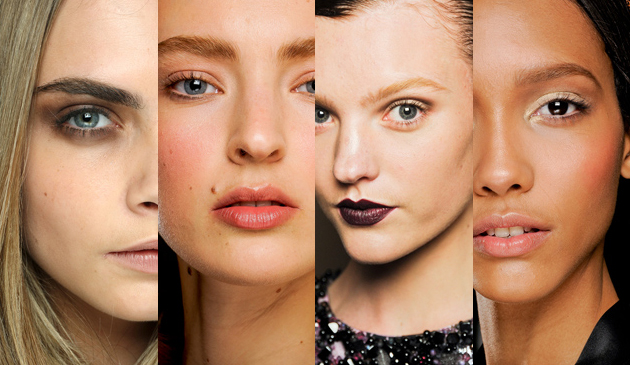
I couldn’t be happier to see that makeup artists are giving love to my favorite style of eyebrow this season. Down the catwalk at Dolce and Gabbana, Pucci, Jil Sander, and Missoni came model after model with gorgeously soft and full eyebrows that are wearable in the real world!
Don’t get me wrong – I love a well defined, exaggeratedly arched, darkly colored brow, too. I’ve also been known to push for the completely bleached out eyebrow on many occasions. However, the reason why I love this look so much is because it basically looks good on every woman. A ‘done’ brow that still looks natural and youthful (our brows generally thin with age [ummm… this is definitely not true for men]) makes most everyone look prettier and more polished.
The key word here is ‘soft’ when we’re talking keeping this look wearable. I like to accomplish this by using a brow powder applied with a brow brush, as well as a brow pencil, and then smudging the whole thing with a qtip. Remember from my smokey eye video with Natalia how I said ‘No hard edges?’ It applies here, too. Doing a natural looking brow on yourself isn’t easy, but it’s one of the most important beautifying tricks you can ever learn.
A very quick lesson in creating and maintaining your brow shape: I don’t agree that there’s an equation for achieving the perfect brow shape. I do believe that too much plucking generally leads to disaster. The inner portion (the part of your brows that directly face each other) should always begin slightly inward from the corner of the eye. Any hair that grows above the bridge of your nose should be removed, but if you have nicely patterned, extraneous hairs that venture a little further inward, leave them! (reference all the eyebrows below to see exactly what I mean) Clean up the bottom line of the brow just enough to create a soft edge. Brows should begin to taper in thickness after the arch, and continue to diminish in thickness towards the outer edge. This will be different for everyone since the density of the hair, the number of hairs, your eye shape, as well as your personal style, will dictate just how much plucking you’ll be doing.
EVERY HAIR is important in an eyebrow. Re-evaluate after each pluck, and never pluck without strong light shining on the area in question and a mirror. I’ve never really been a fan of waxing a brow simply because of my belief that every hair matters… when you wax it’s too easy to take off hairs you didn’t mean to lose. I know plenty of people who love threading which involves a professional using a twisted piece of thread to grasp and pull hair by precious hair.
Most models and celebrities are smart enough to be hesitant to let a makeup artist they don’t know go to town on their brows. To ease their fear in the beginning, I’ll often hand them a mirror so they can see which hair I’m going to remove before I go in for the pluck. I’ve been lucky enough to become known and trusted by the women I work with and now I’m often greeted in the morning with a hug and a kiss and a “Can you fix my brows for me, please?” I love it.
Of note when you pluck: First make sure your skin, fingers, and tweezers are clean. Wipe down the skin with a cleansing toner or witch hazel before and after the plucking.
And now, what you’ve been waiting for me to finally get to, my make up kit brow arsenal:
- Start by brushing the brow with a spooley or toothbrush. See how your brow lays naturally when you brush through them, and how you like the look of it when the hairs are brushed up or angled slightly towards your ear. If plucking is painful for you, try icing the area for a few minutes before you begin, and hold a cool wet washcloth on them when you’ve finished.
- My favorite tweezers have long-since been: Rubis #135, although I’m sure there are plenty of other good ones on the market.
- My favorite brow powders: Paula Dorf 2+1 for brows in all four color options. (ALWAYS pick a shade that looks the exact color of, or slightly lighter than, your brow hair). If you don’t want to buy another makeup item you can use any shade of blonde, tan, taupe, or brown eyeshadow that is completely matte (NO SHIMMER!!).
- My favorite brow powder brushes are: NARS #4 (this is marketed as an eyeliner brush, but is perfect for a soft sweeping deposit of color on the brow), NARS #2 (for a more precise application of color along an edge, or to fill in a hole), and MAC 263 (to add a little beef for those of you whose brows are just really super thin all over.
- The brow pencils I rely on heavily include: MAC brow pencil, Kevyn Aucoin, and Laura Mercier (particularly good: fair blonde & blonde -always keep the tip sharpened). I always opt for the shade that’s the lightest possible match -never go darker – and draw in teeny little individual hair strokes where needed to fill in the shape and to enhance the tail end of each brow.
- If your brow hairs aren’t totally stationary (some peoples’ are) you might like the look of a brow gel or wax to hold them in place. I like the clear one from Paula Dorf, but you can also use hairspray or hair gel on a little spooley or clear mascara from the drugstore.
There are SO many options for powdering and penciling your brow that I haven’t yet tried, both at makeup counters and drugstores. Experiment until you find something you like that gets rave reviews from the honest people in your life!
When in doubt, ask your friends, coworkers, and the stranger on the street where she gets her brows done. If you’re going in for more than just a slight shaping/clean up, don’t’ be afraid to bring pictures from magazines of brows you love (keeping in mind that it’s a tweezer she’ll be using, not a magic wand!). Once they’ve been professionally shaped, keeping up with removing the regrowth isn’t too difficult. Return to your professional every 3-6 months for a tune-up.
Have fun and remember: Your eyebrows needn’t look like identical twins…just sisters! (I don’t know where I heard that, but it’s so true)


